Manage general settings
Destiny Help Desk users with Administrative Permissions can manage the following settings for the district:
To manage General Settings:
- Select Settings > Setup Items > General Settings. The Manage District Settings page appears.

- On the General tab, do any of the following:
Field Description Allow Sign in Via Google Select Yes to allow users to log in with Google single sign-on (SSO).
Note: Selecting No removes the Log In With Google button. This can be helpful if your district is using SAML or a different SSO. Auto Generate User Barcode for New Users Select Yes to have an automated barcode created when a new user is added – whether manually, synced from another platform, imported, or via another product (such as Facilities Drawings). Automated barcodes will be 10 characters, start with a 3, and can contain numbers, uppercase letters, and the following characters: minus (-), plus (+), period (.), dollar sign ($), slash (/), and percent (%).
Select No to have users manually enter a barcode into the Barcode field when adding a new user.
Even with Yes selected, users can manually enter a barcode into the Barcode field.
District E-mail for Contact Form Enter the email address that will receive the contact forms from district staff members. Email Reply Message Type a message to display in the body of an auto-generated no-reply email confirming you received the request. Include Buttons in Emails Select Yes for Approve and Decline buttons to appear in emails. Sales Tax Enter a default sales tax rate for all purchase transactions.
Note: The default can be changed when entering a purchase transaction.
- On the Requests tab, do any of the following:
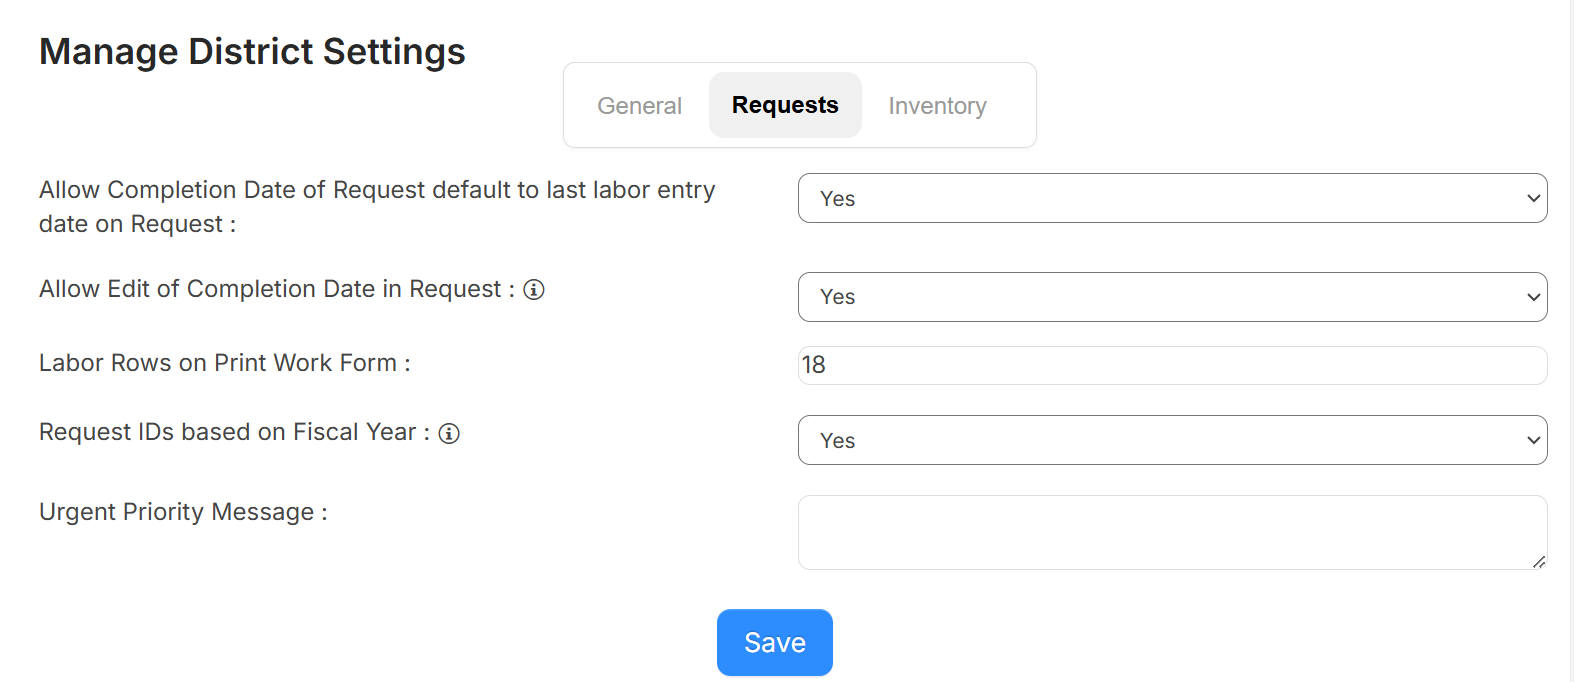
Field Description Allow Completion Date of Request default to last labor entry date on Request Do one of the following:
- Select Yes for the completion date of the request to show the last labor date entered (including if a user adds labor when the request is completed or closed).
- Select No for the completion date to be when the status is updated to Complete.
Allow Edit of Completion Date in Request Select Yes to let users with Edit permission change the completion date. Custom Note for Asset Field on Request Form If you want text displayed under the Asset field on the request form, add the note in this field. Labor Rows on Print Request Form Enter the number of rows you want displayed on the Print Request form. Request IDs based on Fiscal Year Select Yes to reformat your Request ID numbers based on the fiscal year. Urgent Priority Message Type a custom message to display when a user selects Urgent for a request. - On the Inventory tab, do any of the following:
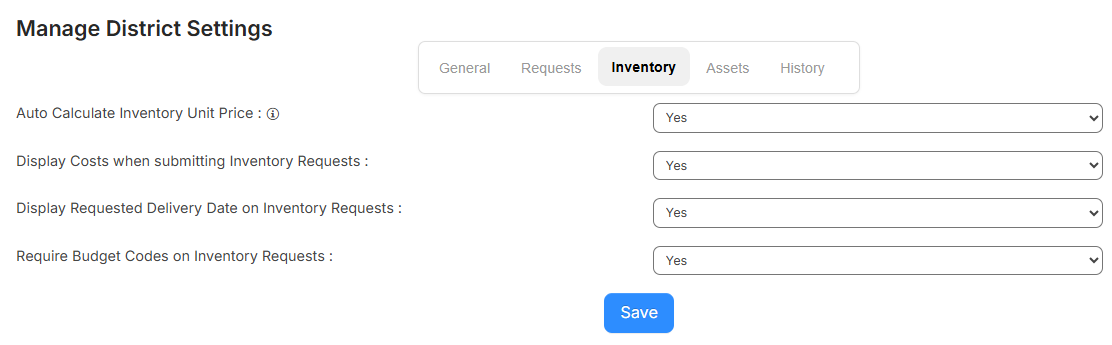
Field Description Auto Calculate Inventory Unit Price Select Yes to auto-calculate your inventory unit prices based on the overall cost for all inventory received. Then divide by the current quantity of the inventory item.
Important: If this setting is enabled, you cannot edit the inventory unit price. Unit prices are set when inventory is received. Display Costs when submitting Inventory Requests Select Yes to display the Price and Total columns on the Confirm Inventory Request page. Display Requested Delivery Date on Inventory Requests: Select Yes to display the Requested Delivery Date on the Confirm Inventory Request page. Require Budget codes on Inventory Requests. Select Yes to require users to add a budget code to their inventory request. - On the Assets tab, do any of the following:
Field Description Auto Generate Barcode for New Assets Select Yes to have a barcode automatically created when a new asset is added – whether manually or imported. Automated barcodes use Code 39 Generic format, will be 10 characters, start with a 5, and can contain numbers, uppercase letters, and the following characters: minus (-), plus (+), period (.), dollar sign ($), slash (/), and percent (%).
Select No to have users manually enter a barcode into the Barcode field when adding a new asset.
Even with Yes selected, users can manually enter a barcode into the Barcode field.
During a sync, barcodes are not overwritten and existing barcodes will not be duplicated.
Charge Warning During Check-Out Select Yes to show a warning pop-up during check out of assets if the user has unpaid charges. The check out can be canceled or the message can be overridden.
Note: This warning will apply at all locations. However, the warning will not apply during bulk circulation.
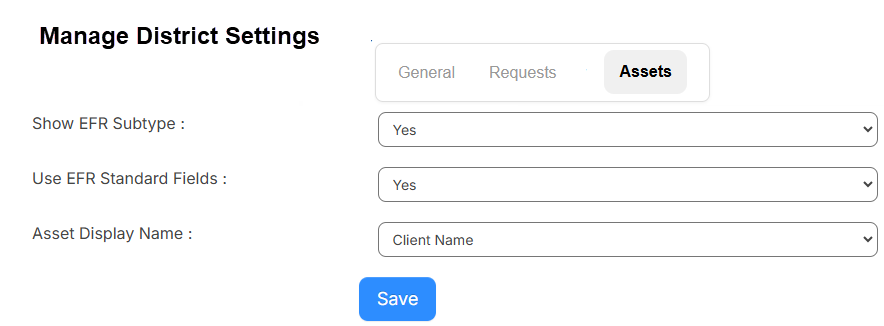
Overdue Reminder Emails Select Yes to send overdue reminders via email. Reminder Email X Days Out Enter the number of days before an item is due to send the overdue reminder. Same Day Reminder Emails Select Yes to send same day reminders via email. Show EFR Subtype Enables the Subtype field to appear on assets which have specific asset types that can be linked to a more granular sub-type. Use EFR Standard Fields Enables Standard Field features which apply additional fields and information to your asset types. Asset Display Name Select one of the following options:
- Asset Name (Asset Type): Displays the existing asset name and type.
- Client Name: Displays a custom client name.
- Client Name(Asset Type): Displays a custom client name and the asset type selected.
- On the History tab, see who made changes to any of the General Settings tabs, what was changed, and when it was changed.

- Click Save.