Approve or decline a request
When requests are submitted, there are three possible ways for Admin users to respond to them:
- Approve with optional notes.
- Decline with optional notes.
- Hold pending more information, parts, or funding.
- Access the desired request by doing one of the following:
- On the bottom of the email notification, click the link.
- When logged in to Help Desk, select Requests > Open Requests.
- Do one of the following:
If you want to.. Then.. Quick-approve a request Click
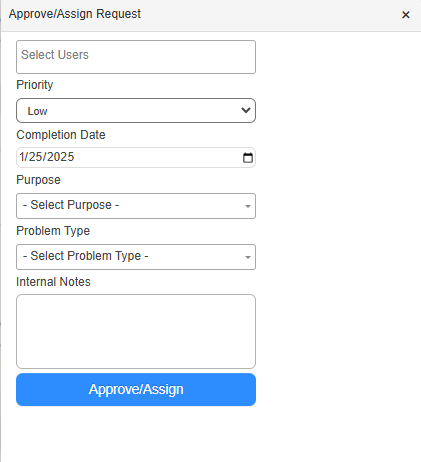
 . The Approve/Assign pop-up appears.
Approve through the request details page - Click the Request ID. The request details page appears.
- Change the Status drop-down to Approve or Assign. The Approve/Assign pop-up appears.
Note: Based on request type, your permissions, and the approval path, you will see Approve, Assign, or both in the Status drop-down.
- Do any of the following:
Note: Based on request type, your permissions, and the approval path, the fields on the Approve/Assign Request pop-up will vary.
- Use the Select Users multi-select drop-down to assign the request to one or more people.
- Set the Priority (Low, Medium, High, Urgent).
- Update the Completion Date.
- Select the Purpose.
- Select the Problem Type.
- Add any desired notes.
- Click Approve/Assign.
- When logged in to Help Desk, select Requests > Open Requests.
- Click the Request ID. The request details page appears.
- To send a note with the declined email, in the Notes field, enter a reason.
- Change the Status drop-down to Decline.
To approve or decline a request via email:
|
Notes:
|
- Open the email.
Note: This email will be from info@masterlibrary.com, and the subject will include the Help Desk request type.
- Click Approve or Decline.
- When logged in to Help Desk, select Requests > Open Requests.
- Click the Request ID.
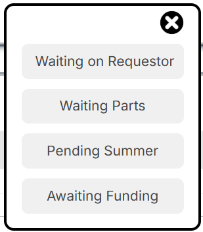
- Change the Status drop-down to On Hold.
- In the pop-up, select a reason for the hold.
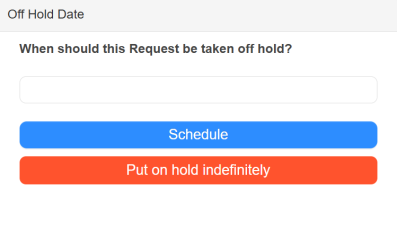
The Off Hold Date pop-up appears.
- Do any of the following:
- To schedule a day to take the request off hold:
- Click the field, and select a date.
- Click Schedule.
- To Put on hold indefinitely, click the button.
- To schedule a day to take the request off hold:
To remove a hold, change the request's status.