Customize your view
Destiny Help Desk allows for quick searching and flexible filtering. Most pages allow you to customize your view.
| Important: The following image shows the All Requests page. The Request ID and Assign to Me do not appear on pages, such as Manage Users or View All PMs. |

|
Note: Universal search checks the following fields:
|
Filters
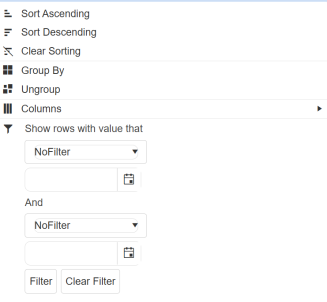
On any of the customizable pages, you can click a column to add filters. The column header has a filter icon (![]() sam) when a filter is applied.
sam) when a filter is applied.
To sort a filtered column in ascending or descending order, do one of the following:
- Click
 sam (filter icon) and
  (sort icon) appears.
 - Click
 (flexible filtering icon). Select Sort Ascending or Sort Descending, and then click Filter at the bottom of the pop-up.
After adding specific columns or filters, you can save them. Filters are page-specific.
| Important: Pages save your most recent filters to create a customized view (even if you have changed pages or logged out). |
To save filter settings:
- Set any filters and columns you want.
- Select Actions > Add New Saved Filter.
- Enter a name.
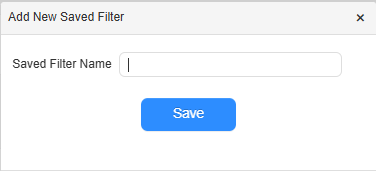
- Click Save.
Once a filter is saved, the page updates and uses that filter. The filter is available for use by clicking the Select Saved Filter drop-down at the top-left of the page.
Columns
Sort, group, or choose specific data to see in a column by clicking (flexible filtering icon).
You can also add or remove columns to control the filtering options on a page.
To add or remove a column:
| Note: All custom fields for requests are available as a selectable column. |
- Click Columns. The Select Columns pop-up appears.
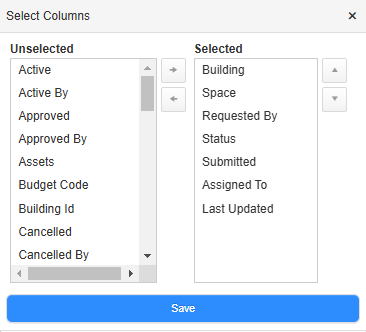
- To add a column, from the Unselected section, select the column you want to display and then click the right arrow.
- To remove a column, from the Selected section, select the column you want to remove and then click the left arrow.
- To change the order columns appear, drag and drop in the desired order.
- Click Save.